🍪 Introduction: The Dessert That Brings Everyone Together
There’s something magical about a dessert bar that balances crunch, gooey caramel, and melty chocolate — all without turning on your oven. Enter the Caramel Chocolate Crunch Bars: a nostalgic treat that whispers of Grandma’s kitchen, family gatherings, and dessert trays that vanish in minutes.
These bars manage to hit all the right notes: a buttery, crunchy base, a thick veil of caramel, a layer of rich chocolate, and a topping that adds texture and personality. They’re simple, quick, and universally loved. Whether you’re preparing for a potluck, needing a last-minute dessert, or simply treating yourself, these bars deliver comfort and delight.
In this article you’ll learn:
- Why this recipe works so well
- Ingredient breakdown and reasons behind each component
- Step-by-step instructions (no baking required!)
- Tips to get perfect texture and crunch
- Variations and flavour twists
- Storage, serving ideas, and presentation
Let’s dive in.
🧬 Why This Recipe Works: The Perfect Balance
✅ Crunch Meets Gooey
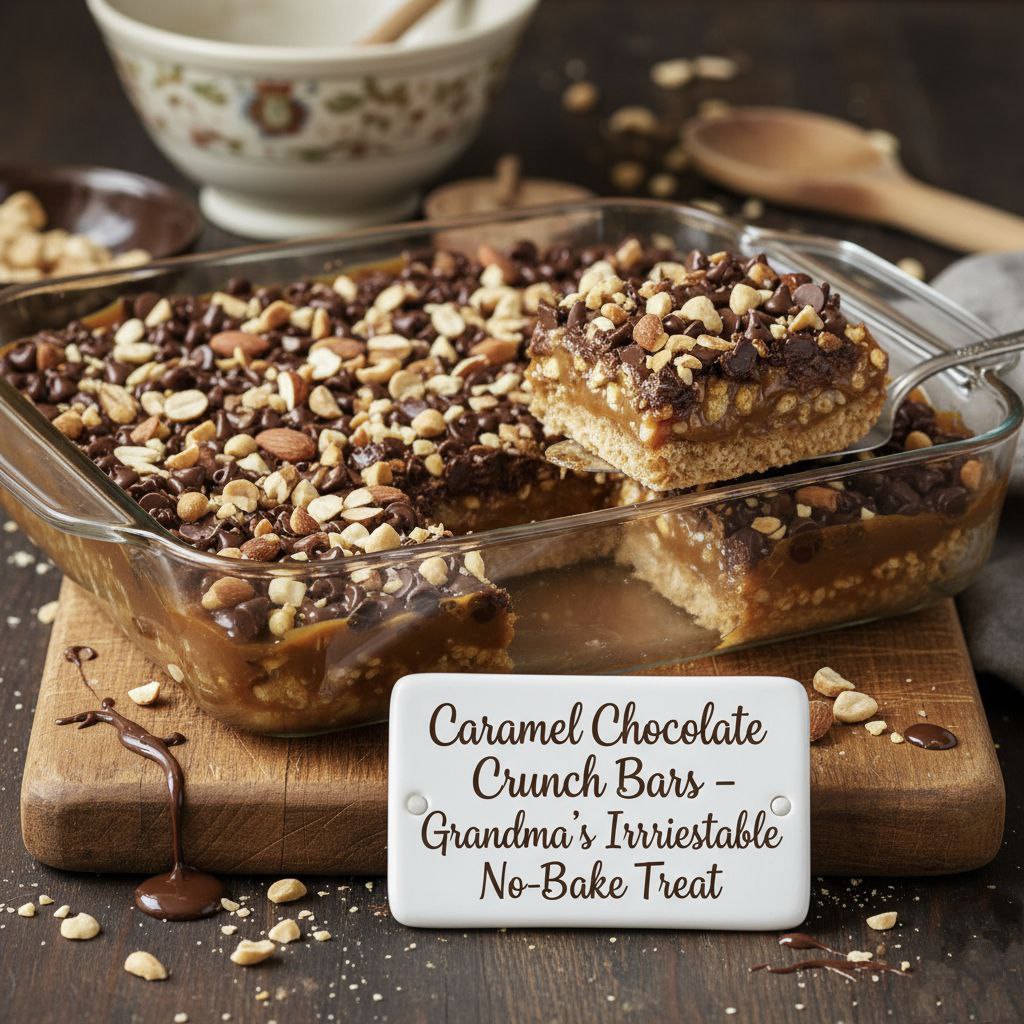
The base layer provides firm structure and crunch — typically made from butter-crumbled crackers or grahams. On top sits a caramel layer that adds depth and a luxurious texture. The final chocolate layer seals it all together and adds richness. This layering creates a contrast of textures that our brains love.
✅ No-Bake Ease
Many versions of these bars skip traditional baking. For example, one recipe calls them “super easy… require no baking in the oven.” That means less oven heat, less mess, and big flavour reward.
✅ Familiar Pantry Ingredients
You don’t need exotic ingredients. Most staples — butter, caramel bits, graham crackers or oats, chocolate chips — are pantry-friendly. This makes the recipe accessible and stress-free.
🥣 Ingredients & What Each Does
Here’s a base recipe inspired by several sources (yield ~24 bars in a 9×13 pan) with commentary for each ingredient.
For the Base/Crunch Layer:
- 80 club crackers (or similar) / or ~2 cups graham cracker crumbs. → Provides structure & crunch.
- ½ cup (approx) melted butter. → Binds crumbs and adds richness.
- 1 cup packed brown sugar. → Deep caramel flavour in the base.
- 1 cup quick oats (in some variations) → Adds chew and texture.
- 1/2 cup flour (in oat-based version) → Helps the mixture set.
For the Caramel & Chocolate Layers:
- 1 package caramel bits (≈11 oz) / or caramel sauce ~1 cup. → The gooey heart of the bar.
- 2 tablespoons milk (if using caramel bits) → Helps caramel melt smoothly.
- 1 cup semi-sweet chocolate chips for topping. → Melts into a glossy, indulgent layer.
- Optional: chopped dark chocolate or nuts for extra texture.
Optional Add-ons for Crunch or Variation:
- Pretzel pieces, peanuts, pistachios, marshmallows.
- Sea salt sprinkle on top for sweet-salty contrast.
🔪 Step-by-Step Instructions
Here’s the detailed method. Feel free to adapt for your kitchen size or ingredient availability.
Step 1 – Prepare the Pan and Base
- Line a 9×13-inch (23×33 cm) baking pan with foil (or parchment) and leave overhang for easy lift-out.
- If using club crackers: arrange a single layer to cover the bottom. If using crumb base: combine crumbs/oats/flour/sugar/butter, mix till “sandy” then press firmly into pan.
- If baking base (optional): Pre-heat oven to 350 °F (175 °C) and bake base for ~10 minutes until slightly set. Some no-bake versions skip this.
Step 2 – Melt Caramel Layer
- If using caramel bits: unwrap and place in a saucepan or microwave-safe bowl with milk. Melt gently stirring often until smooth.
- Spread the melted caramel evenly over the base. Make sure it covers fully so each bar gets that gooey layer.
Step 3 – Add Chocolate Layer
- Immediately after caramel, sprinkle chocolate chips over the top (while still warm) so chips melt slightly. Or drizzle melted chocolate/ganache over the top.
- For extra texture: top with chopped nuts, pretzels, sea salt flakes.
Step 4 – Chill and Set
- Refrigerate the pan for 1 to 2 hours (or longer overnight) until bars are firm and layers are set.
- Use the foil overhang to lift the bars out of the pan. Use a sharp knife (warm slightly if sticky) to cut into squares or bars.
Step 5 – Serve and Enjoy
- Serve bars chilled but slightly at room temp for best chew.
- Pair with a scoop of vanilla ice cream or a hot drink for contrast.
🧠 Pro Tips for Best Results
- Cool base completely before adding caramel if you skipped baking — prevents mixing of layers.
- Press crumbs firmly so base holds. Use bottom of a measuring cup to even it.
- Use good quality chocolate — it makes a difference in taste and melt.
- Chill thoroughly — cutting too soon causes layers to collapse.
- For clean-cut bars, chill then freeze ~10 minutes before slicing; wipe knife between cuts.
- Store airtight: bars hold well for up to a week in fridge; freeze for up to 2 months in single-layer wrap.
🔄 Variations & Flavor Upgrades
Here are ways to customize your bars:
🎄 Holiday Crunch Bars
Add chopped peppermint candy cane on top for a festive twist.
🥜 Nut & Pretzel Crunch
Mix peanuts, pretzels and sea salt into the caramel layer for savory texture.
🥥 Coconut Caramel Bars
Add shredded toasted coconut in the base layer or sprinkle on top.
🧁 Mini Version
Press into muffin tin liners to make individual bite-sized bars — great for parties.
🌱 Gluten-Free Version
Use gluten-free graham crumbs or almond flour in base; check caramel/ chocolate for gluten content.
🍫 Dark Chocolate Indulgence
Use dark chocolate (70% cocoa) for a richer, slightly less sweet version.
🍯 Homemade Caramel Twist
Make your own caramel sauce with sugar, butter and cream for a gourmet upgrade.
🍽 Serving Ideas & Occasions
These bars are perfect for:
- Potlucks, bake sales, dessert trays
- Afternoon coffee treat
- Holidays – Christmas, Thanksgiving
- Birthday parties for all ages
- Simple after-dinner sweet fix
Present them on a dessert board, stack them, or wrap individually in parchment for gifting.
🧊 Storage & Make-Ahead Tips
- Refrigeration: Store in an airtight container in fridge for up to 7 days.
- Freezing: Wrap individual bars in plastic wrap and freeze up to 2 months. Thaw in fridge ~30 minutes.
- If bars become too firm after freezing, allow to soften at room temp 5-10 minutes before serving.
📊 Nutritional Considerations
These bars are indulgent — rich in butter, sugar, chocolate and caramel. One recipe estimates ~265 calories per bar (when cut into 24) with significant sugar and fat.
Tips if you want to lighten them:
- Use less butter, or substitute part with melted coconut oil.
- Use half the caramel or choose “light” caramel sauce.
- Use dark chocolate or reduce chips.
- Make smaller bar size so portions are smaller.
🏁 Conclusion: A Classic Treat Worth Making
If you’re after a dessert that delivers true joy, texture, flavour and nostalgia — the Caramel Chocolate Crunch Bars hit the mark. They’re simple, striking, and bake-free in many versions, which means they’re perfect whether you’re an experienced baker or a beginner.
Make them for friends, family, yourself — the crunch, caramel and chocolate layers will win hearts. So gather your ingredients, line your pan, melt that caramel, and get ready to delight.